
Airtightness – High Performance Airtight Materials and How to Join Them

Achieving a low energy home that retains its heat well means targeting a low air leakage value.
Since the advent of the cavity wall and the separate insulation layer, build ups rely less on thickness and mass, and more on layers of construction, each doing their own job with some less than a millimetre thick. This division of roles has probably led to the poor construction that typifies much of the 20th century relying on brackets, ties, adhesives, mechanical fixings – each of which solves one problem but creates another, like cold bridges, moisture traps, corrosion and air leakage paths.
Compared to the farmhouse, we have made it more complicated, but for good reason. Legislation states we must limit heat loss through surfaces and ventilation losses via air leakage. The Climate Emergency demands greater responsibility to not waste energy and resources, and people have higher expectations for their internal environments. We’d enjoy a weekend at an idyllic remote farmhouse Airbnb, but wouldn’t choose to live there.
We know how to build very well insulated and airtight buildings, but it is still not the standard approach. Ask any consumer if they’d like to live in a warm, well-ventilated home with low (or zero) bills, excellent air quality and a low carbon footprint, you’d find few who’d decline. What should be best practice for our health and the environment is still considered niche.
The Passivhaus Standard remains the best example of highly airtight, low energy buildings, but even here things can go wrong. The Passivhaus Trust say,
‘…airtightness is the thing that most commonly goes wrong in UK Passivhaus projects. Incomplete or inadequate design for airtightness is compounded by contractors lacking the appropriate site culture, without the necessary skilled operatives and management teams. This leads to delays, cost penalties and, in extreme cases, the failure to deliver a satisfactory level of airtightness.’ (PHT Demystifying Airtightness: Good Practice Guide 2020)
This article will explore ways to correctly design and install the internal airtight layer, crucial to heating and ventilation strategies, and user comfort. We’ll look at when to implement an airtight strategy, the role of airtight materials and how to join everything effectively using tapes, membranes and liquid applications.
Build Tight, Ventilate Right
The UK convention for airtightness is defined by how much air escapes through 1m2 of building fabric at a specified pressure. You’ll often see the terms airtightness, air leakage or air permeability used interchangeably, and as long as they all use m3/m2.hr @ 50 Pascals (or Pa), they all mean the same thing. Note this differs to the European approach that uses air changes per hour. Let’s quickly run through some definitions that we’ll need to use when designing and specifying:
Air changes per hour is a volume ratio, considering the volume of air within a building. ACH is calculated by dividing the flow rate by volume in m3. In the Passivhaus Standard the air tightness target of 0.6ach is also called the n50 value, which must be evidenced by a test.
Air permeability is derived from the surface area of the building. It is calculated by dividing the flow rate by surface area in m2.
Air testing, also called the AP50 value in m3/m2.hr @ 50 Pa, is set out in the UK Building Regulations Part L using the ATTMA (Air Tightness Testing and Measurement Association) methodology. In Passivhaus terminology, the nearest equivalent is the q50 value.
There is no direct conversion between ACH and air permeability, so be clear which you are using.
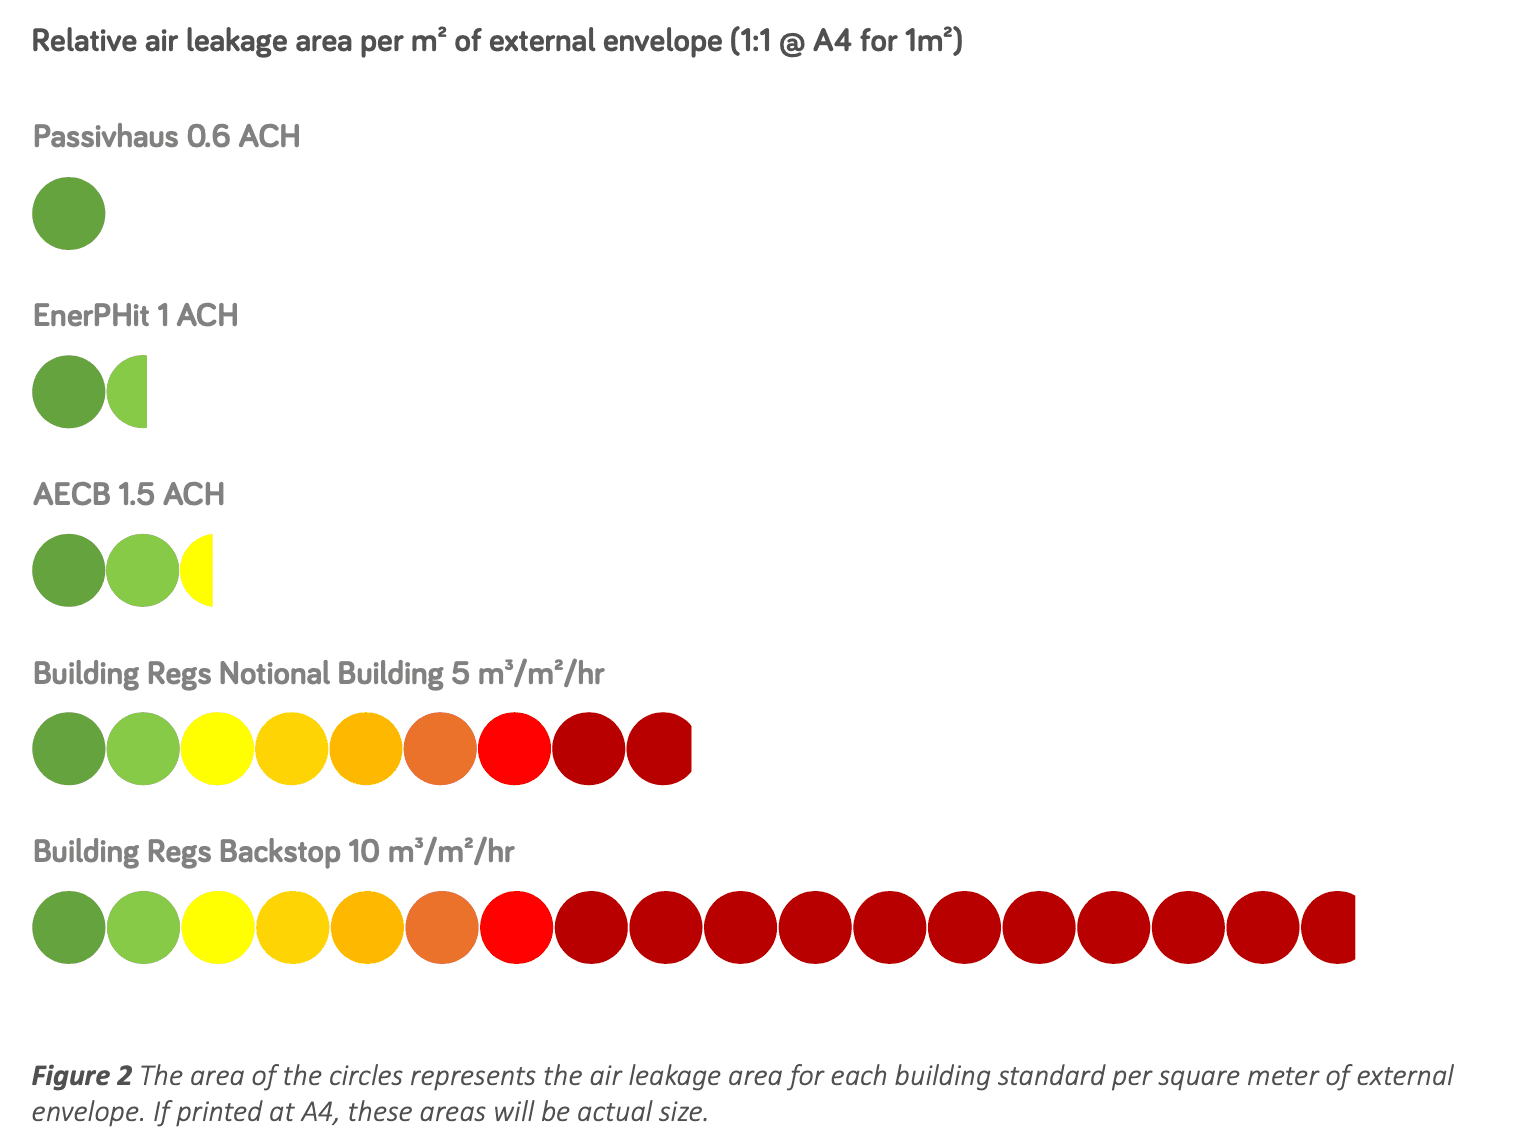
Image Credit: Passivhaus Trust Demystifying Airtightness – A Good Practice Guide, 2020.
Setting Targets and Design Approach
Achieving a low energy home that retains its heat well means targeting a low air leakage value (so nearer to 0 the better). This immediately impacts on design decisions like:
- Complexity of the form (keep it simple!)
- Number of openings through the envelope (as few as possible)
- Structural systems (avoid structure penetrating the envelope)
- Heavyweight vs lightweight construction
- Ventilation Strategy and internal air quality (more on this later)
- Choice of materials
It can also change the design process, leading to more detailing, only tendering to contractors who have experience of airtight construction and factoring in periods for air testing pre/mid/post completion. Aspirational airtightness targets based on best practice are found within the guidance produced by LETI, the Passivhaus Trust, AECB etc. Here’s a summary:
- 8 m3/m2.hr is the Part L Building Regulations limit
- 5 m3/m2.hr is the airtightness of my 1960s house, also a typical New Build target of UK housebuilders in 2025 (make of that what you will)
- ≤5 m3/m2.hr is the AECB Carbonlite Retrofit Step by Step limit
- 3 ach is LETI best practice for a constrained retrofit
- 2 ach is LETI best practice for an unconstrained retrofit
- ≤1.5 m3/m2.hr is the AECB New Build target
- ≤1 m3/m2.hr is LETI best practice for New Build
- ≤1 ach is Passivhaus EnerPHit, also LETI exemplar retrofit
- ≤0.6 ach is Passivhaus.
To achieve the lower values, airtightness needs to be embedded in the design from first principles.
5 is the Magic Number
A ventilation strategy must balance uncontrolled ventilation (cracks, gaps and leaks) and controlled ventilation (trickle vents, fans etc.). If we can limit uncontrolled ventilation to zero, then we have full control over flow rates, temperature and humidity.
Between the statutory minimum air leakage (8) and best practice (1) there is a threshold ≤ 5 where mechanical ventilation is recommended to achieve healthy indoor air quality. This is enshrined in Scottish Building Regulations (though not yet other parts of the UK). Others quote ≤3 for MVHR in well insulated and airtight homes. In cricket parlance, Geoffrey Boycott would call this ‘the corridor of uncertainty’.
You therefore must decide – are we aiming for low air leakage alongside MVHR, or high air leakage with natural ventilation? The latter will never be low energy. Low air leakage with natural ventilation is not an option for good health, nor is hedging your bets around 5, where you’ll be trapped LBW and sent back to the pavilion. The reason why this is so important is that retrofitting MVHR is very tricky, so must be integrated into the layouts early, not shoehorned in at Stage 4.

For effective MVHR ≤5 is recommended, but ≤3 is considered ideal
Designing to a number
Having picked a number, we must now work towards achieving it, but we can only design for zero air leakage. You do not get standard details that give an airtightness of 3, or 5, or air seal tapes that are used for 3 and above, or 1 and below.
So, we have a conundrum; we know that airtightness below 5 requires a whole house MVHR system for a healthy home, yet it is impossible to design to an airtightness number. Instead, you give yourself the best chance of success and test your performance along the way.
The sensible approach is to always include MVHR (which gives you a range from 0-5 for a test result) and use best practice details, well written specifications, toolbox talks and on-site inspections to maximise the chances of being closer to 0 than 5.
The Role of Drawings
Controlling the junctions is key to achieving a good air test result. A design that uses simple forms, standard details and tested components will always be easier to construct than a complex form. Planning for the air test should start with the concept design and the choice of the major fabric elements. The approach must then be explicit on all project documentation (drawings, details and specifications) to communicate this to all the contractors and trades.
The best way to communicate the design intent for airtightness is on the drawings. Not just on one drawing called ‘Airtightness Strategy’ but on all the drawings, using a consistent colour coded legend. A common way to communicate this is to:
- Pick one colour to denote the airtightness layer on plans, sections & details.
- Pick another colour to denote the external watertight layer.
- Use a third colour to denote thermal elements on plans, sections & details.
If the design is complete, all lines will be continuous, in all directions, without gaps. Once the structure and services are integrated into the plans, you can identify where the airtightness line will be breached, so at this point you can choose to optimise the design (to limit openings) or consider how those penetrations will be sealed on site.
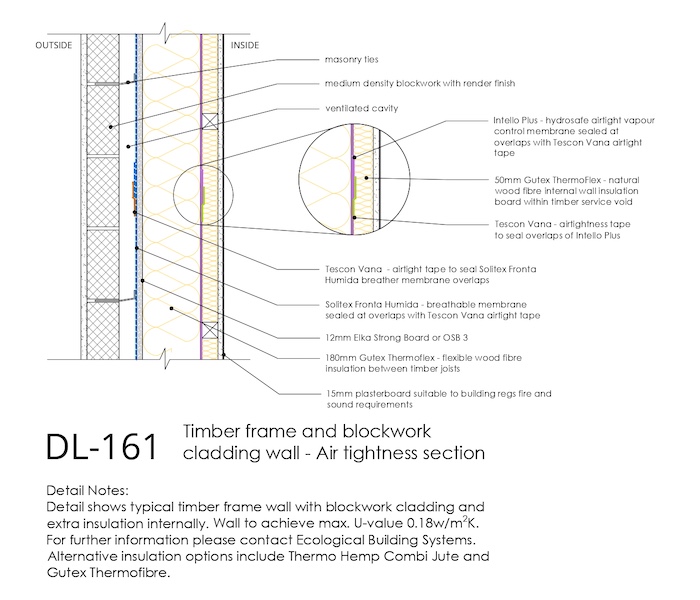
DL 161 – Timber Frame and Blockwork Wall – detail drawn in collaboration with Ecological Building Systems
Where is the Blue Line?
The Passivhaus approach recommends using a blue line for airtightness. There are pros and cons when choosing where to locate the airtightness line:
- If the airtight line is the internal finish, this means it will be frequently punctured by fixtures and fittings, wall sockets, picture hooks etc. As it is fully visible, it can be easily repaired but relies on sealants which will slowly degrade.
- If a service zone is used, the unseen internal face of the wall can be airtight. Sockets and conduits run in the service zone, without puncturing the airtight layer, which might be a sheathing board or membrane. This should provide long term protection, but it must be tested thoroughly before being covered up. Service zones make the wall thicker, reducing floor space.
- It may be tempting to think the airtight line would be far easier to control on the outside of the construction. Let’s say this worked for the wall build up, but this approach normally fails where the walls meet floors and roofs where the airtightness is located on the inside. It shows the importance of achieving continuity around the whole envelope.
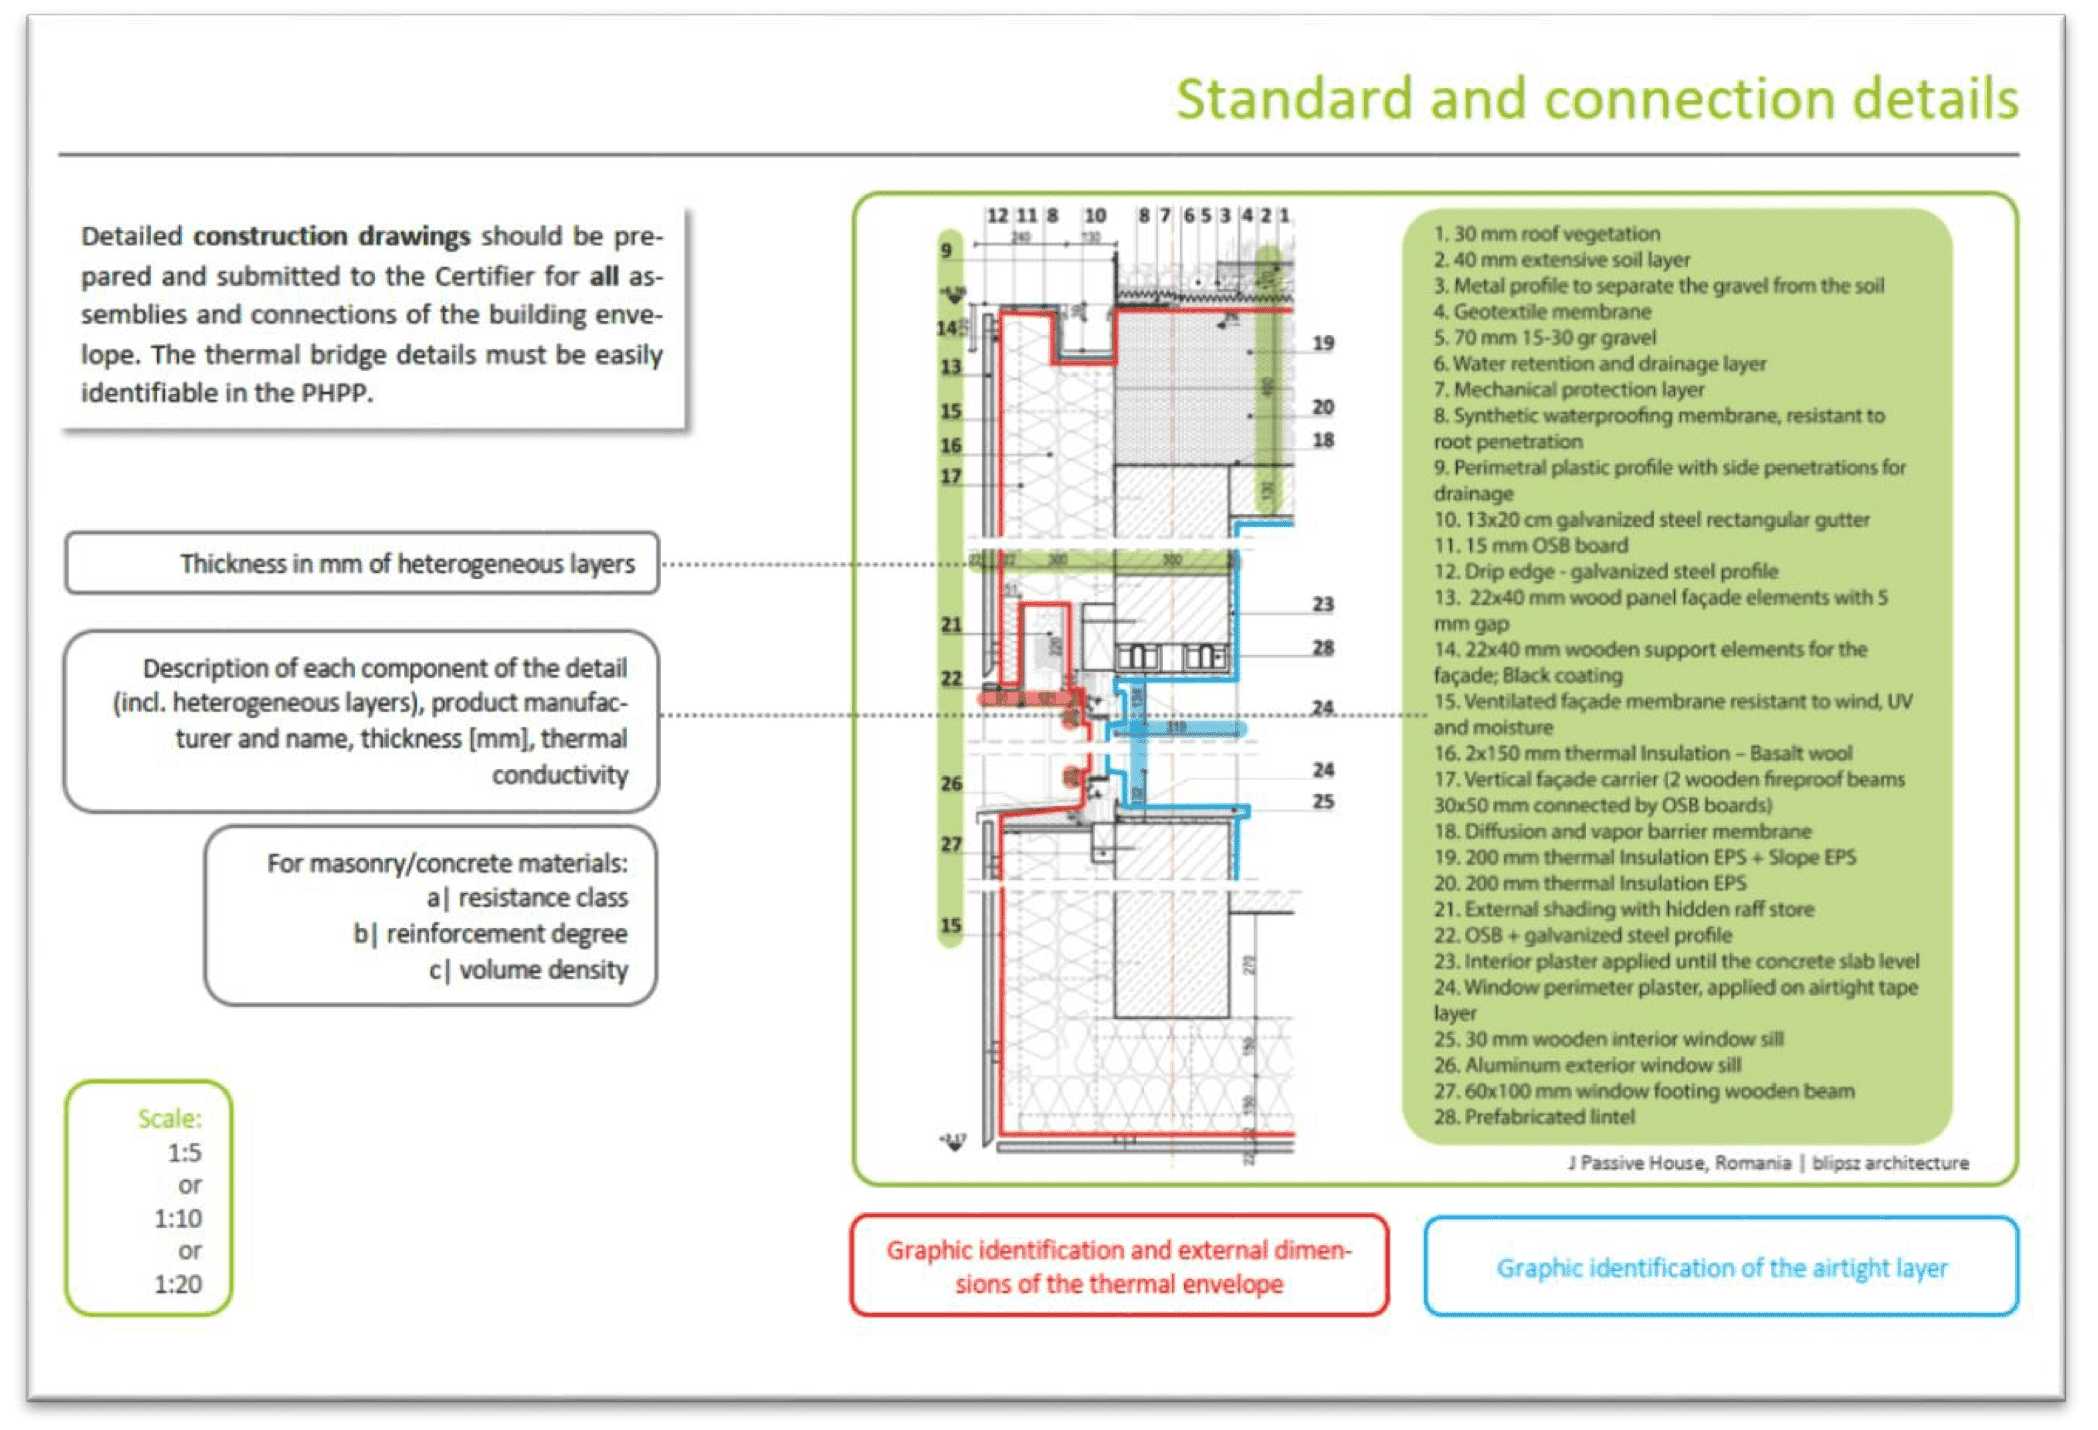
(Example of best practice detailing from Criteria for Buildings, Passive House – EnerPHit – PHI Low Energy Building Version 10c)
Materials used for airtightness
Once you have determined where the line will be located, the materials must be selected to allow the strategy to work. The airtight materials broadly split down into two types:
- Monolithic materials that act as an airtight plane
- Materials used for jointing
Most designs will have a mixture of these. For example, monolithic materials include in-situ concrete, pre-cast concrete floor slabs, poured floor screeds, glass, steel beams, timber sections (CLT, glu-lam) or foil faced insulation boards that air cannot pass through. For the drawings, the blue line simply follows the internal face of the material to its edge.
Other materials can also act in a monolithic way, like wet plaster. Therefore, our 17th century farmhouse with lime plaster internally has an airtight layer (whilst still being ‘moisture open’), just like a modern home with gypsum plaster (‘moisture closed’) across a substrate like blockwork.
Blockwork is a good example of a material that may appear airtight but is not. Others include standard duct tape, aluminium foil tape, expanding foam, skim finishes <5mm and plywood. It is possible to get airtight sealants like Pro Clima Orcon F, but these are not to be confused with a common builder’s mastic, which are not airtight.
Compared to blockwork, a clay block system like Porotherm is inherently more airtight as an individual unit but must still have a parge (or sealing) coat applied to cover the joints between the blocks. Other parge coat materials include clay plaster used over stone walls before wood fibre insulation is applied (a common retrofit detail).
Other specification considerations are:
- buildability
- availability of stock
- access and complexity
- recycled content, recyclability and embodied carbon.
Sheathing boards and OSB
For timber framed construction or SIPS (structurally insulated panels) the internal face of the timber studs is faced with a sheathing board. This has various functions, forming an integral part of the structural support (also called a racking board) whilst also acting as an airtight layer and vapour barrier to prevent internal moisture meeting the soft insulation typically used within these build ups.
Although OSB can be airtight, it is not always airtight. Only specialist airtight OSB (like the green coated Smartply OSB3 panel) should be specified for this purpose. Products like Durelis VapourBlock or Finsa SuperPan VapourStop are racking boards with full vapour control (achieved via a surface coating). Alternatively, if you need your sheathing board to be moisture open, then Elka Strong Board is an example that gives structural integrity.
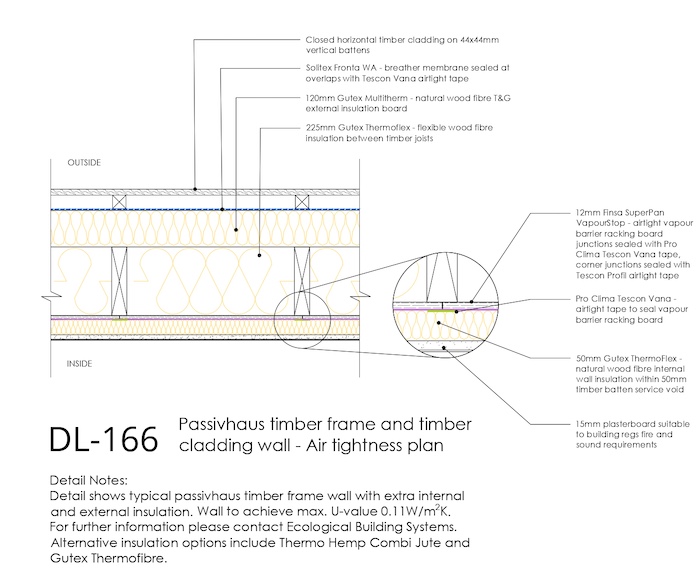
DL 166 – Timber Frame Wall with Timber Cladding – detail drawn in collaboration with Ecological Building Systems
DL 177 – Timber Frame Roof with Rooflight – detail drawn in collaboration with Ecological Building Systems
Sheet membranes
If the underlying substrate is not airtight, then it must be faced in a material that is, like a membrane. Choice of membranes could be a whole article in itself, so specify these carefully with airtightness and moisture management in mind. As a quick identification:
- A full vapour barrier is airtight and impermeable, suitable for modern constructions,
- A vapour control layer may allow the passage of either air or water vapour with the SD value used to indicate resistance (higher value = less breathable),
- A breather membrane (used externally) is weatherproof but allows moisture to escape,
- Intelligent membranes like Pro Clima Intello respond to humidity so are used for internal airtightness whilst allowing moisture vapour to pass through.
Air seal tapes
Linking the monolithic surfaces are the jointing materials including air seal tapes and EPDMs (self-adhesive butyl rubber strips). Spending an hour with a manufacturer to select the best solution for each junction will be time well spent. For jointing of board materials (e.g. PIR insulation or sheathing board) air seal tape is the simplest solution. It is also used to link window frames back to an internal airtight layer within the reveals.
To maximise adhesion, ensure all surfaces are dust free. Primers may be needed if attempting to seal to surfaces like gypsum plaster or smooth concrete. Using a tool like a Pressfix is recommended to ensure the tape has no rucks or gaps. Corner tapes are available with two release strips, useful for window reveals. Not all tapes are created equal so check what is being used on site is not a cheap alternative.
Grommets
For service penetrations (cables, pipes ducts) there are proprietary grommets that can be used to ensure no air leakage happens around the hole. These create a far better seal than ad hoc tape applications. Increasing the size of the hole actually aids the sealing up process, as it becomes less fiddly. Pre-cut and ‘ready to stick’ grommets are available for all manner of junctions, electric socket openings, cables and pipes. They often use an EPDM collar that sits snugly around the pipe. Ensure the design leaves space to accommodate these.
For other necessary penetrations like recessed lighting, loft lids are used to cap the light fitting from above, sealed around the edges with air seal tape. Proprietary loft hatches arrive insulated and with air sealed openings.
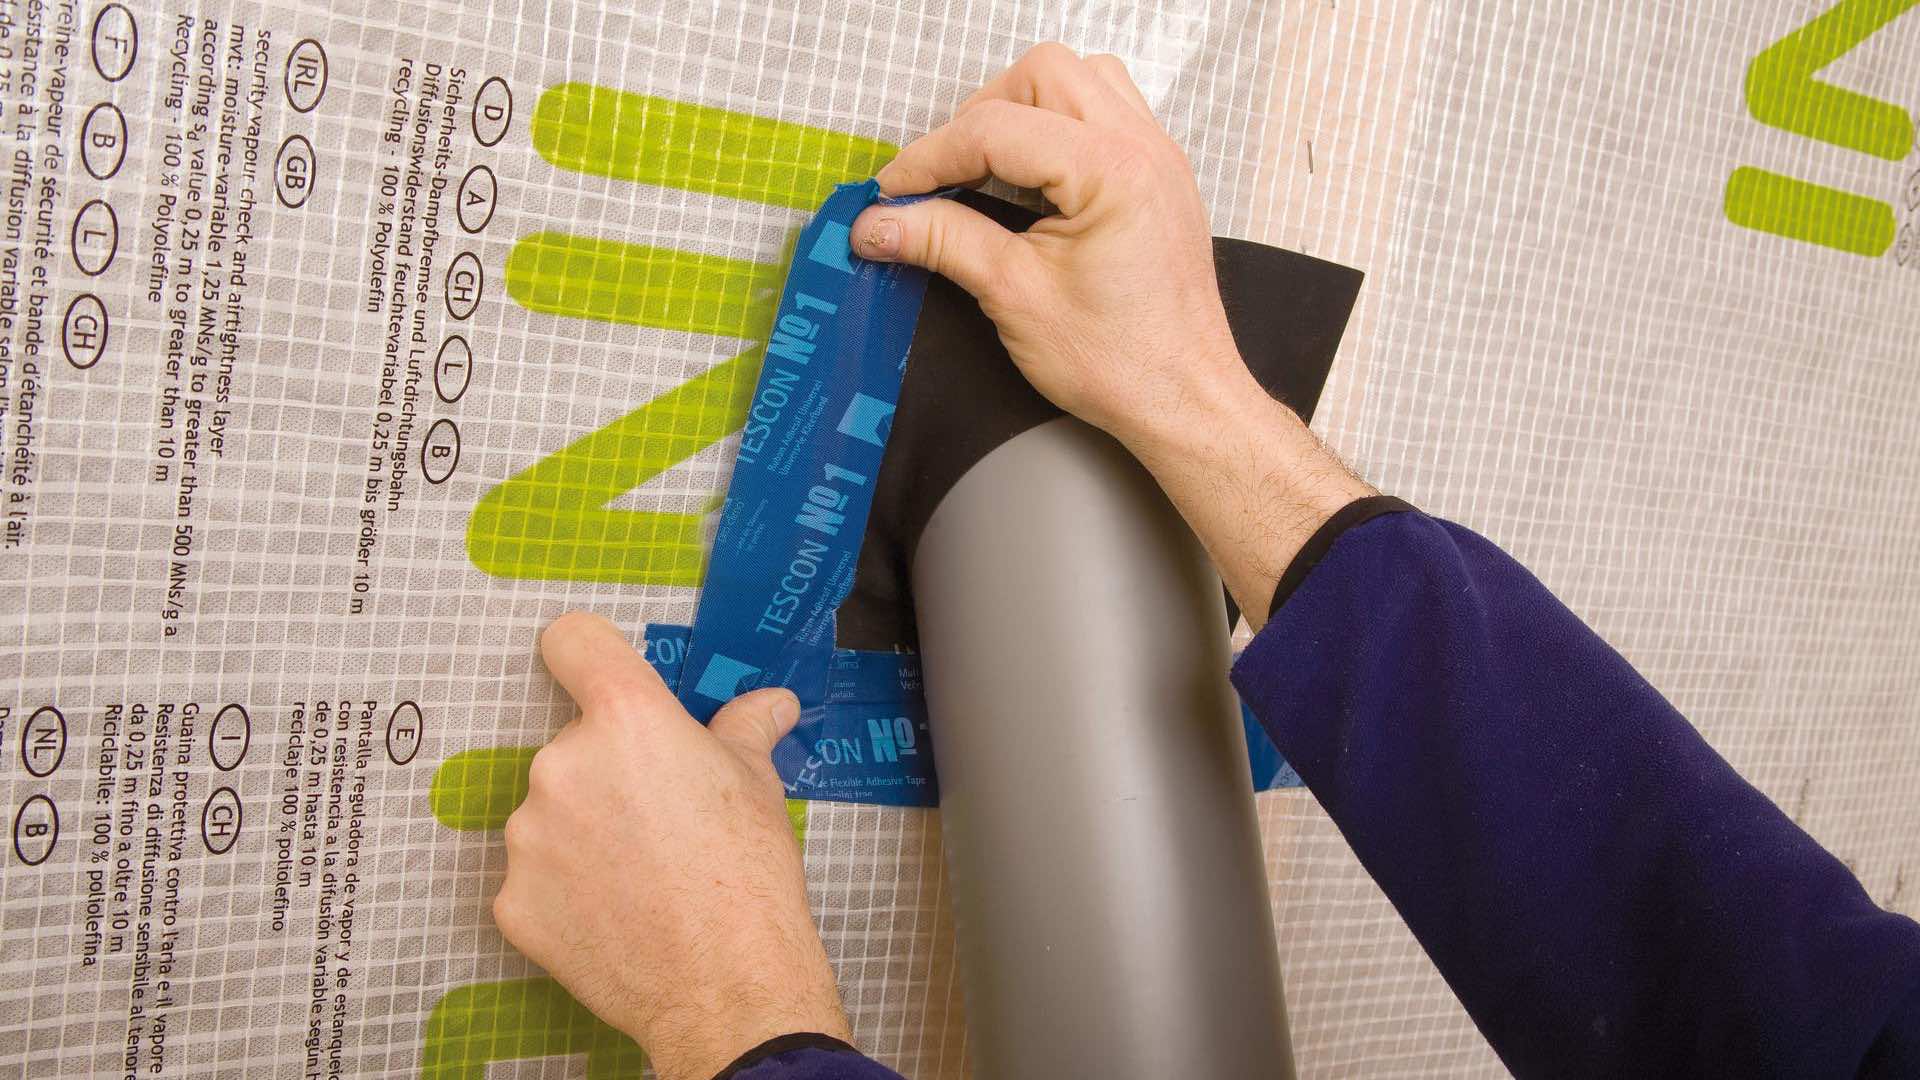
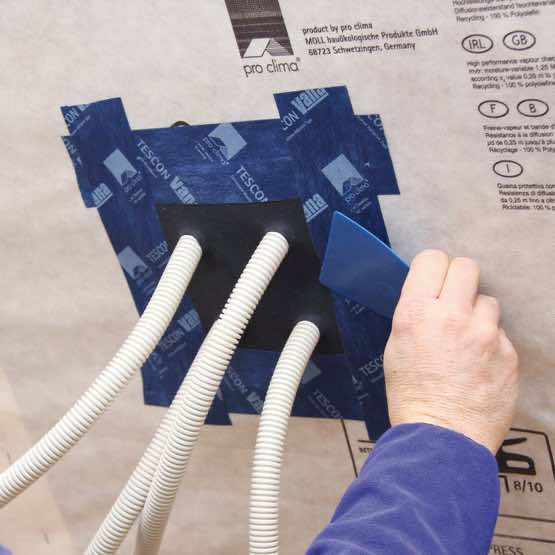
Images Credit: Pro Clima Grommets
Liquid Membranes
At complex junctions, sealing with short lengths of tape is time consuming, making a liquid applied solution far quicker. These are applied with brush, roller or spray on gaps up to 3mm wide but can be used on wider gaps up to 20mm with fibre reinforced liquids or additional fleece strips. Common applications for liquid applied membranes include:
- Wall to floor junctions
- Around joist ends at intermediate floors or roofs
- On rough surfaces like masonry or stone
- To link monolithic surfaces to structural steels or timber wall plates
- Sealing butt jointed boards
- Applied to the chases in blockwork before conduit or electric boxes are fitted.
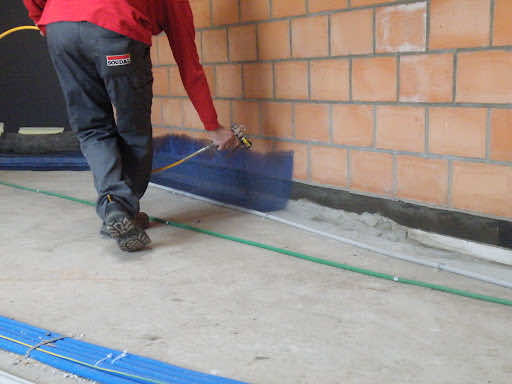
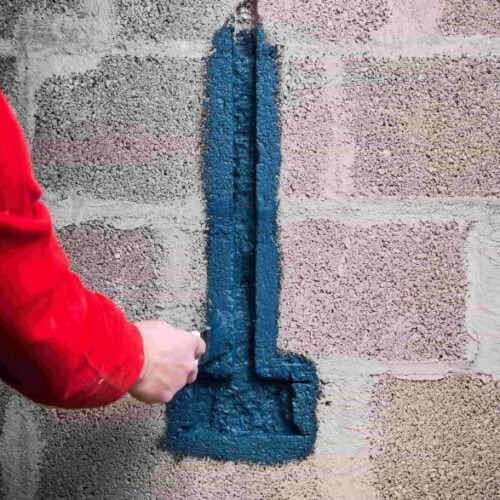
Images credit: Soudal
Tips for Success
Here are a few tips you might want to build into your specifications, or cover in a toolbox talk to the site team:
- Dust is the enemy of good air seals, so ensure a clean and tidy site
- Use the printed guides on the face of membranes to ensure the correct overlaps are achieved
- Cut membranes with a sharp blade, working in max. 3m lengths to make it more manageable
- Use a pneumatic stapler for large areas ensuring the membranes are not overstretched to accommodate building movement
- Do not attempt to install air seal measures in freezing temperatures
- Use max. arm’s length sections of tape and use a Pressfix tool for better adhesion
- Think about sequencing so membrane laps can be left for the next trade
- Pre-plaster surfaces before first fix M&E (impossible to do afterwards)
- Plan an airtightness test once the airtightness line is complete before being covered by finishes.
Summary
Airtightness is the one element that all trades on a building site will contribute to – making it the most complex to manage. Through good design decisions, clear communication and use of appropriate materials, you can give the builder the best chance to hit a high-performance target for your client. In this game, 0 is a great score. When the test result comes in, you can raise your bat to the pavilion, salute the home crowd and soak up the warm applause.
Related Reading



Author
Written by Alex Bell, BSc(Hons) MArch ARB RIBA CR, Retrofit Architect, Retrofit Coordinator and Passivhaus Designer with 25 years’ experience of design and construction. Alex practises low energy, sustainable design using the Passivhaus principles, EnerPHit or the PAS 2035 Retrofit approach.
Image Credits
Image 01: Passivhaus Trust Demystifying Airtightness – A Good Practice Guide, 2020.
Image 03: Example of best practice detailing from Criteria for Buildings, Passive House – EnerPHit – PHI Low Energy Building Version 10c
Images 04 & 05: Pro Clima Grommet
Images 07 & 08: Soudal
